How to add custom forms to inventory
Whether you want to collect extra information from your guests or sell them add-ons, custom forms will help. These can be added to your inventory options so that every time someone books that option, they’re given the chance to fill out the form.
There are two main types of custom forms, which also known as booking fields:
- Guest Forms: These are fields that can be filled out for every guest in a booking. If 6 PAX are booked, the form can be filled out 6 times. These are also known as per-guest booking fields.
- Primary Forms: These are fields that are only filled out once for the whole booking. If 6 PAX are booked, the form can still only be filled out once.
No matter which type of form you want to make, they’re both set up in the same way, and they’re both created in the same place: when creating or editing an inventory option.
Create custom forms
To start creating custom forms, first, go to edit an option.
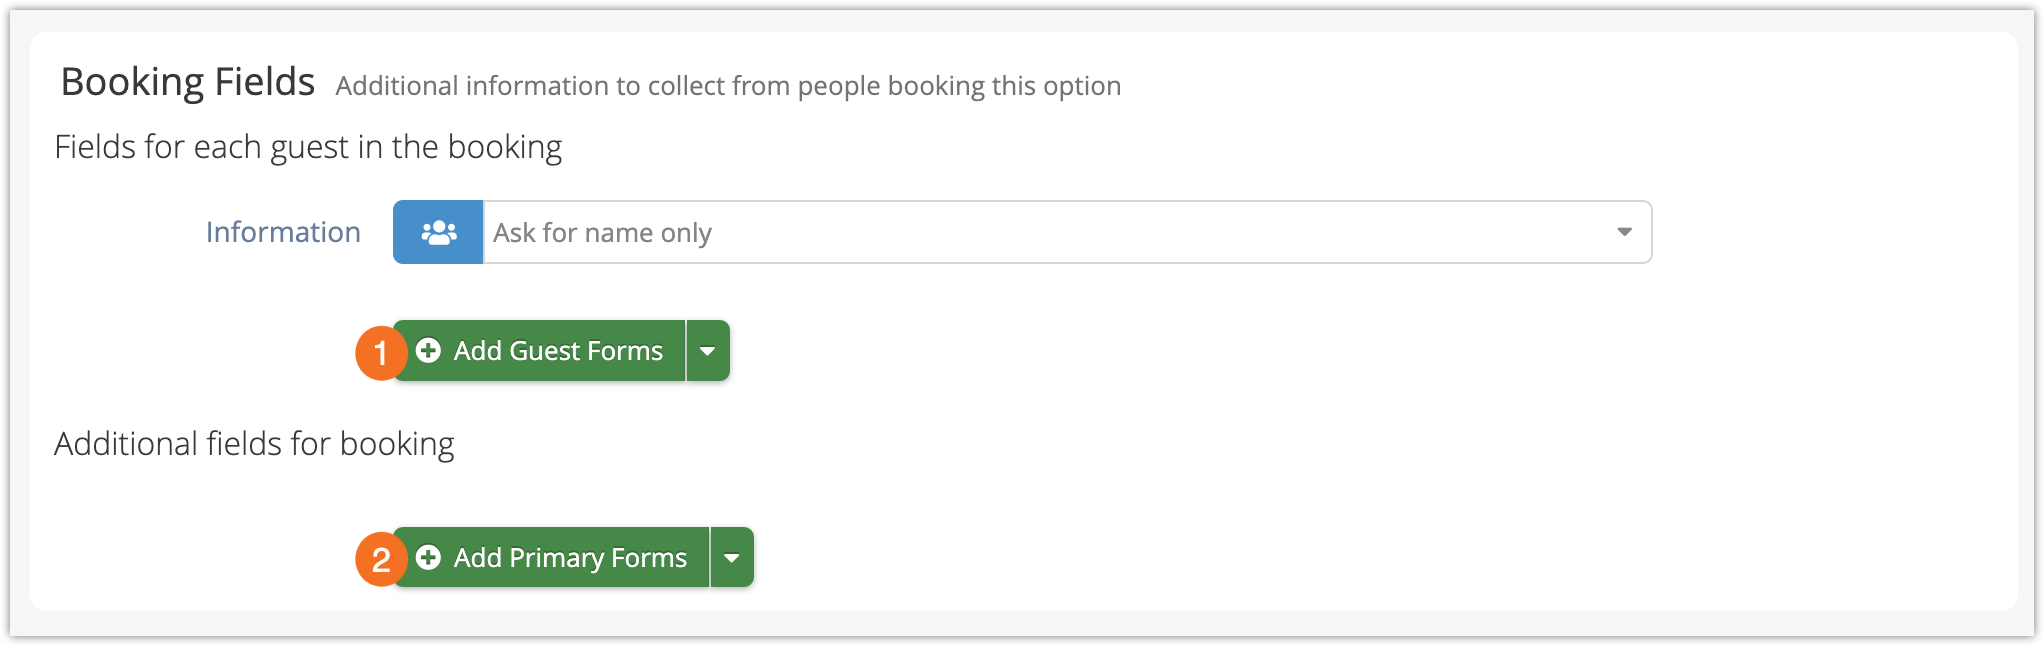
You’ll find custom forms in the Booking Fields section.
1. Click on Add Guest Forms (1) or Add Primary Forms (2) depending on whether you want your form to be filled out for every guest or once per booking.
Now, let’s start customizing your new form.
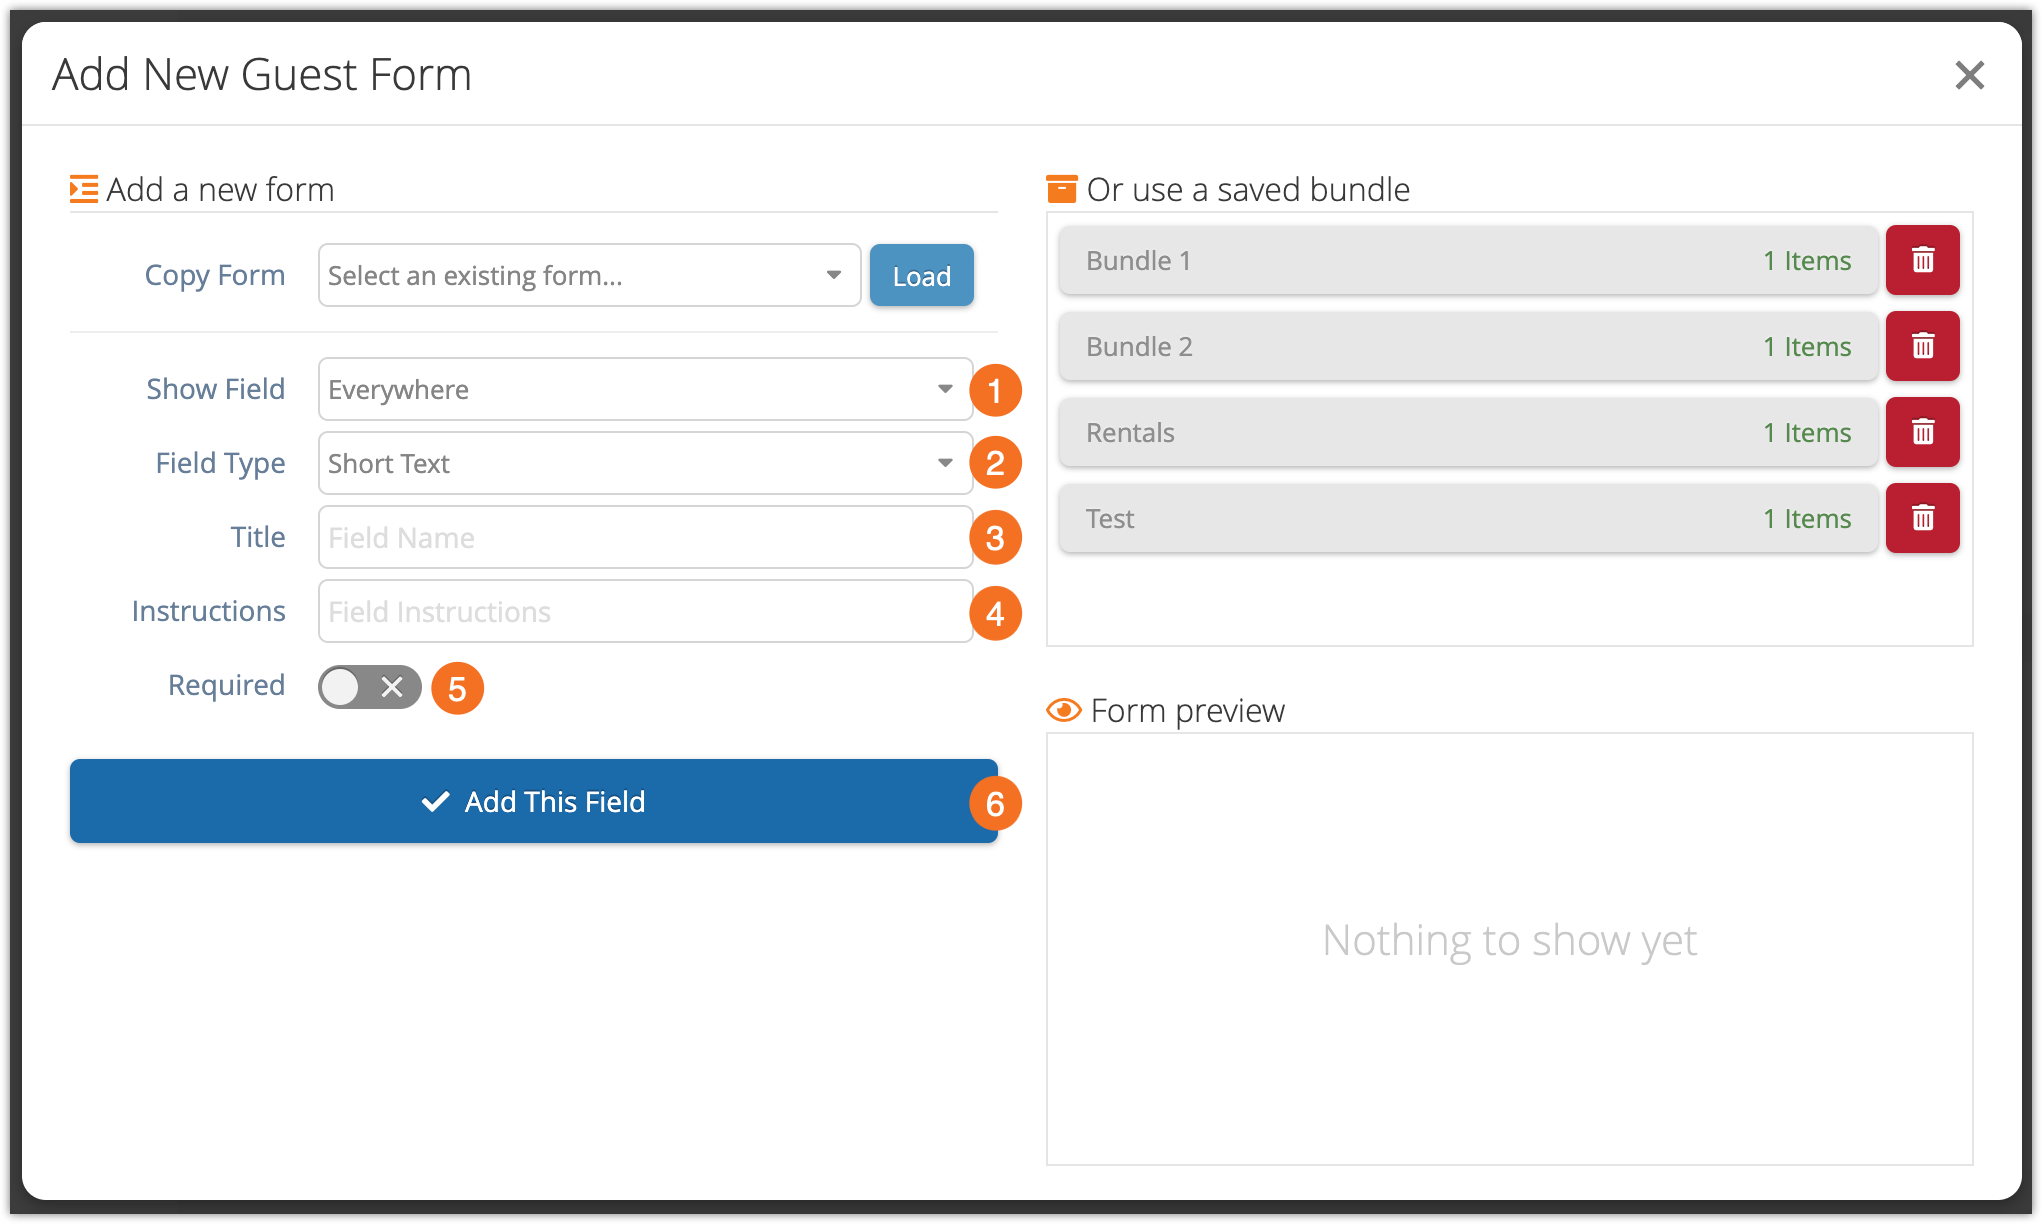
2. Click the Show Field (1) dropdown and choose where you want the field to be shown.
- Everywhere includes the point of sale and your booking website.
- On Back-End Only leaves the form off your booking website – it’ll only be shown on the POS.
3. Next, choose the field type (2) you want to use.
- Short Text fields allow the guest or your employees to enter a small amount of text.
- Checkboxes can either be checked or left unchecked. These can also be flagged to show up on your Dispatch and Daily Manifest.
- Dropdowns show a list of answers, and your guest or staff can select one.
- Multiple Choice fields show a list, and your guest or staff can select more than one.
- Large Text Areas have more space for answers than short text areas.
- Date Pickers let the guest or staff member select a date. Don’t use this for your booking date–that should be set up in your option’s availability. This form is only for extra dates you need to know, like travel dates.
- Price Checkboxes let guests or staff select optional add-ons. The booking’s price will be adjusted by the amount you set if they check the box. Like other Checkboxes, Price Checkboxes can be flagged on your Daily Manifest and Dispatch views.
- Price Dropdowns let guests or staff choose one of a selection of add-ons. Again, the booking’s price will be adjusted by the amount of any they select.
Each of these has its own details, but there are a few more steps that they all have in common:
4. Enter the form’s title (3). This is what will show up beside it during checkout, or on the POS.
5. Enter instructions (4). These can tell your customer what they should do with the form, and what it’s intended to do. They can also be shown on the POS, if needed.
6. Toggle whether the field should be required or not (5).
7. Fill out additional details as needed. If this form is a short text area, a long text area, or a date picker, you’re done. Other field types are explained more in the next section.
8. Click Add This Field (6) and continue to add any more custom forms you need.
9. When you finish editing the option, click Save Changes.
Additional details for custom forms
Most custom form field types require a little extra information. Here’s what you need to do for each of them:
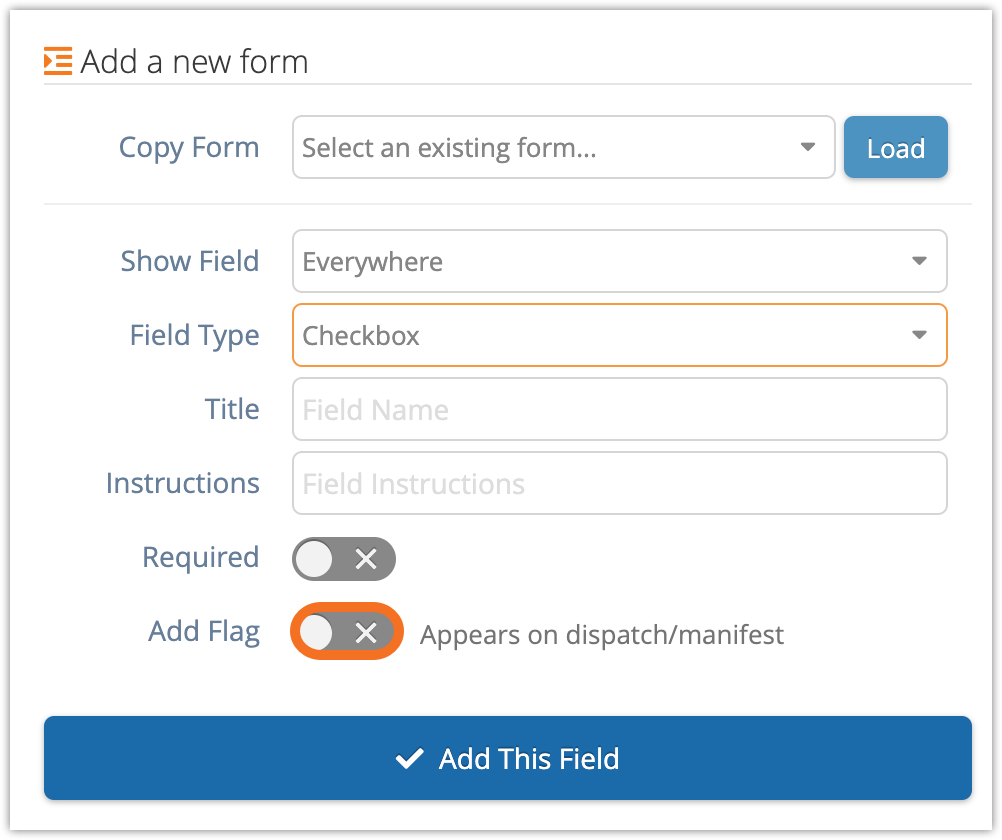
Checkbox
Checkboxes have an “Add Flag” toggle. If you enable it, the checkbox status will be shown on your Daily Manifest and Dispatch views.
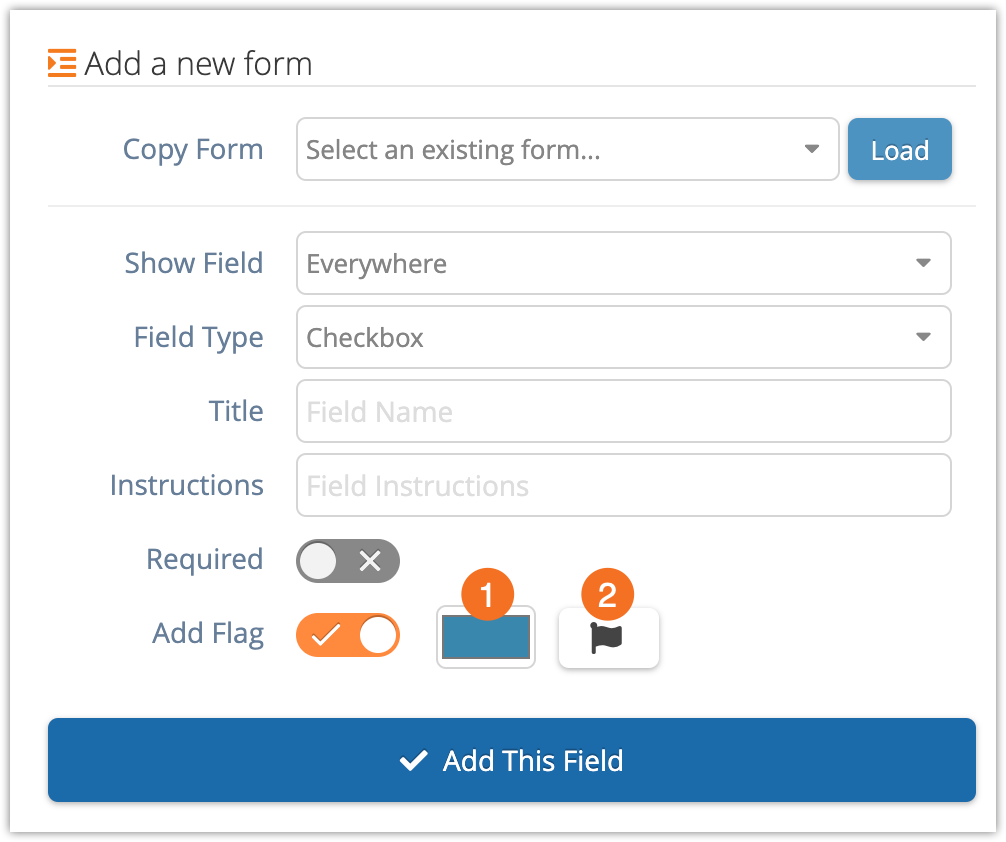
You can pick a color (1) and an icon (2) to represent the checkbox. If the checkbox is checked, that icon will be shown in that color on the booking’s entry in the Daily Manifest and Dispatch.
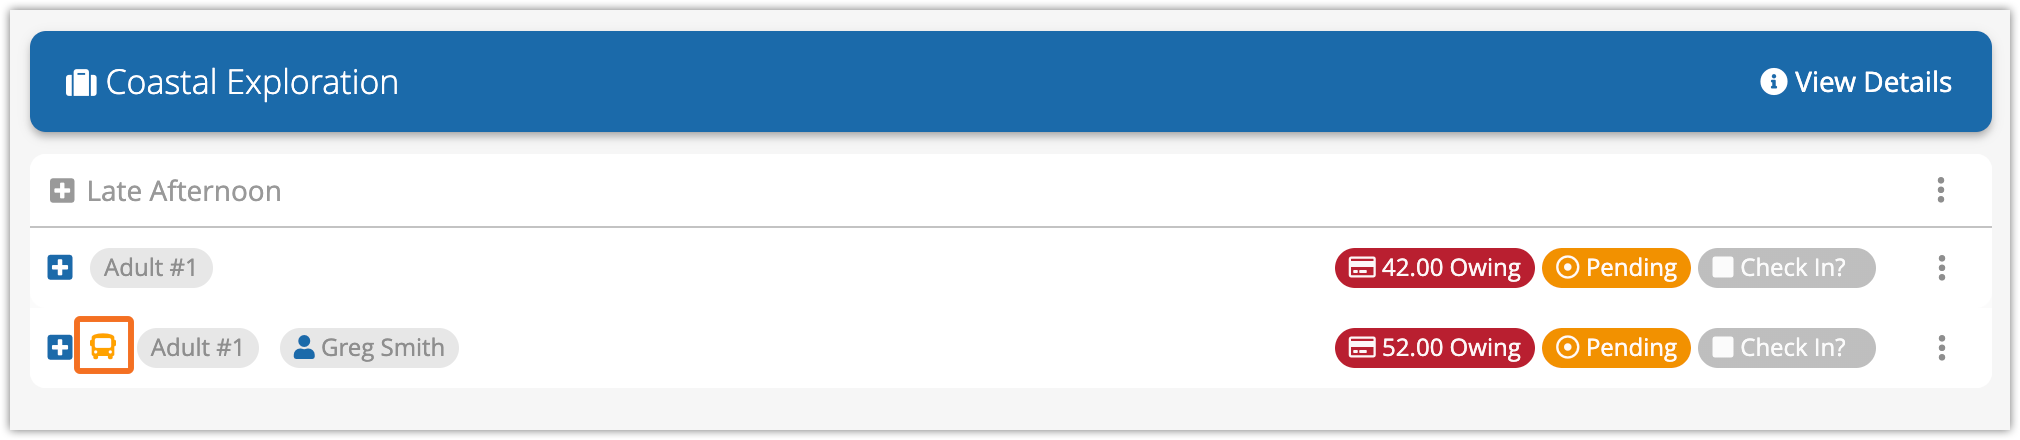
Here’s an example of a flag on the Daily Manifest:
Dropdowns and Multiple Choice
Dropdowns and Multiple Choice forms need Options. These are the entries your customer or staff can select from. The only difference between the two form types is that only one option can be chosen on Dropdowns, while multiple can be chosen on Multiple Choice forms.
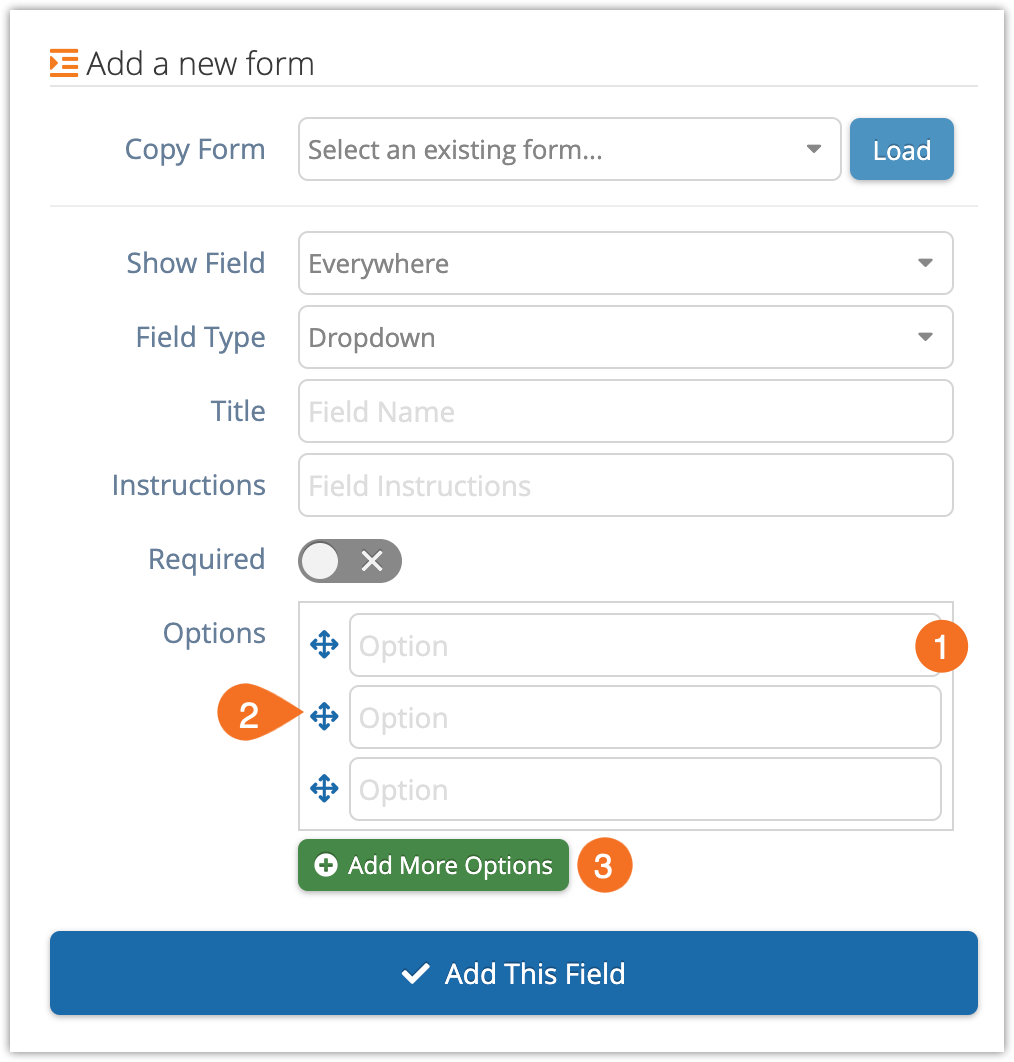
Enter text in the option field (1).
Reorganize the entries by dragging the move button (2) next to them up or down in the list.
Click Add More Options (3) if you need more than 3 entries in your dropdown.
Price Checkbox
Price Checkbox forms need a Price.
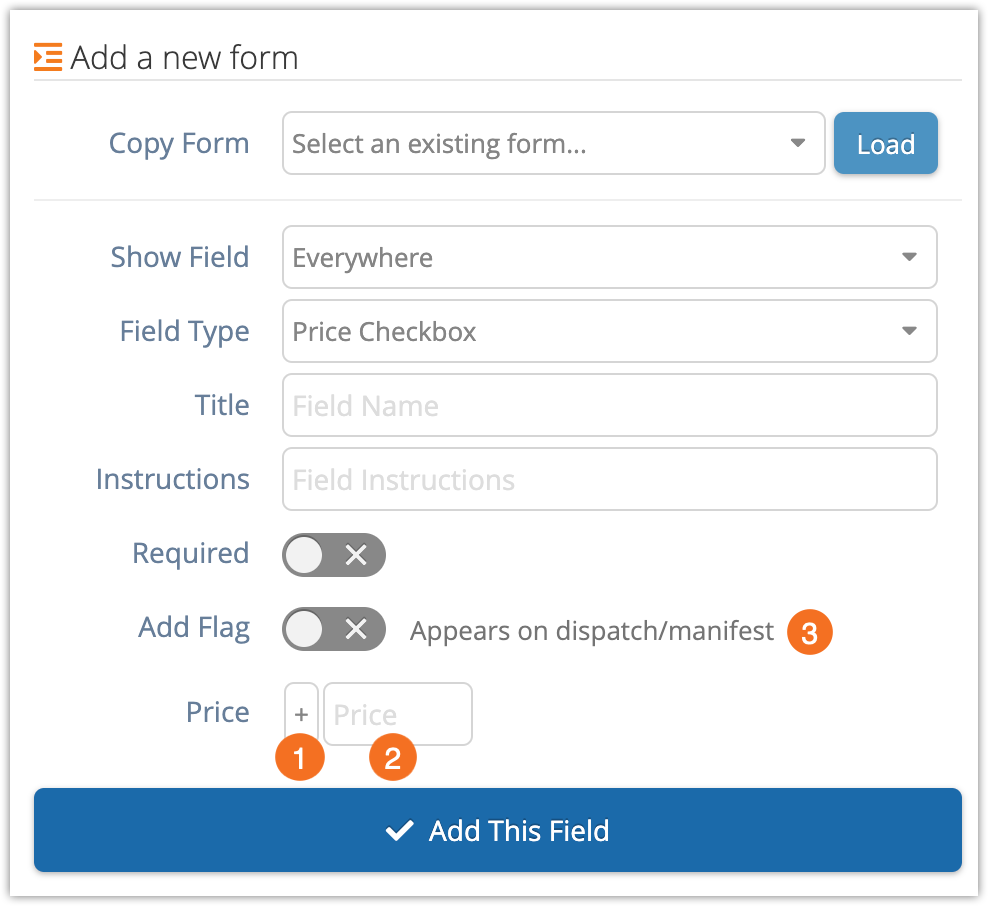
Select + to have the price checkbox add to the cost of the booking when checked, or – to have the price checkbox subtract from the price of the booking (1).
Enter a number in the Price field (2). This is the amount that will be added or subtracted.
Price Checkboxes also have an “Add Flag” toggle (3). If you enable it, the checkbox status will be shown on your Daily Manifest and Dispatch views.
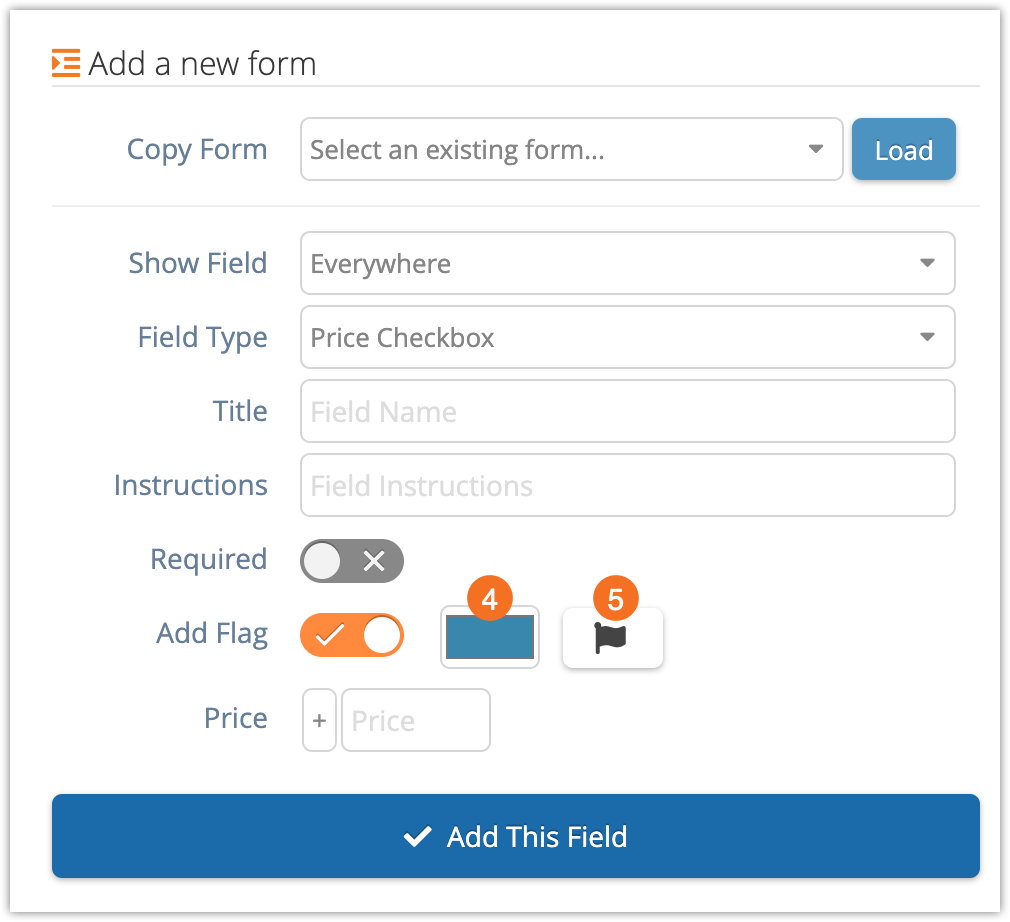
You can pick a color (4) and an icon (5) to represent the checkbox. If the checkbox is checked, that icon will be shown in that color on the booking’s entry in the Daily Manifest and Dispatch.
Here’s an example of a flag on the Daily Manifest:
Price Dropdown
Price dropdowns combine price checkboxes with dropdowns, allowing your guests to choose one of several paid add-ons.
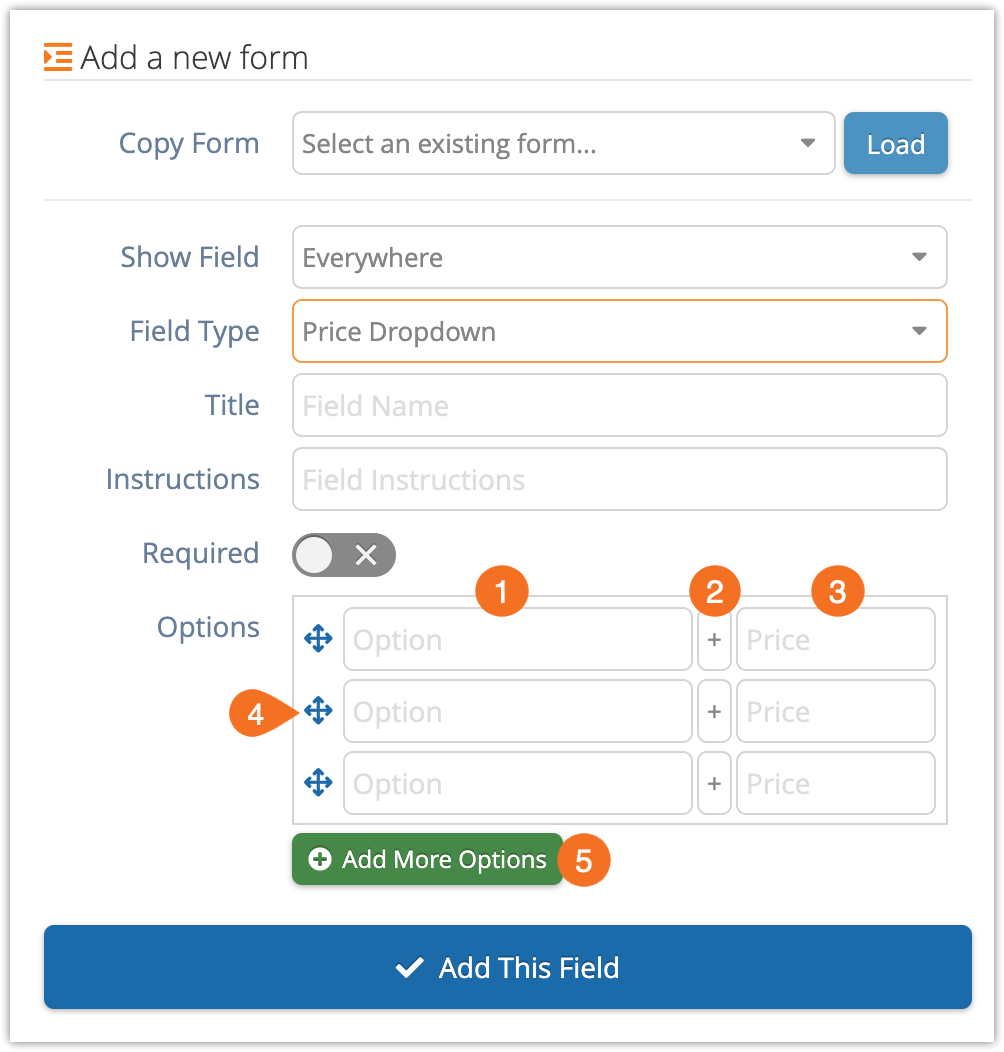
Enter the name of the selection in the Option field (1).
Select + to have the price checkbox add to the cost of the booking when checked, or – to have the price checkbox subtract from the price of the booking (2).
Enter a number in the Price field (3). This is the amount that will be added or subtracted.
Reorganize the entries by dragging the move button (4) next to them up or down in the list.
Click Add More Options (5)if you need additional entries.
Manage your custom forms
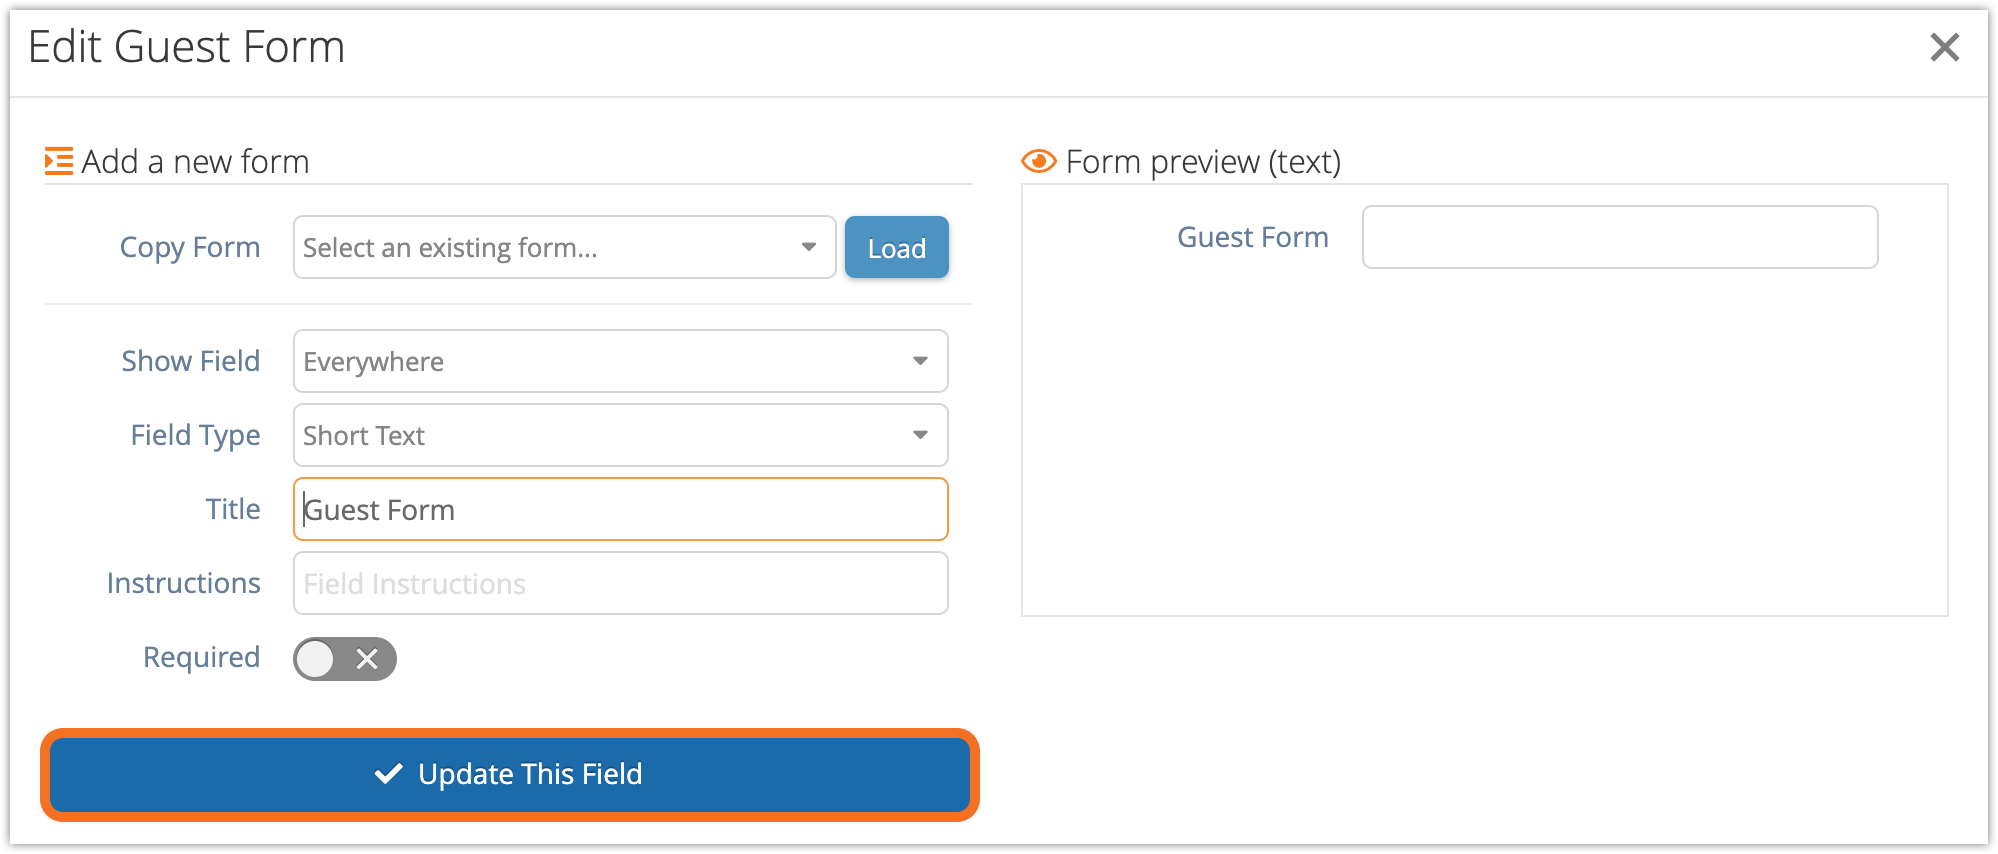
Edit a custom form
To edit a form on a booking, click the edit button.

Make your changes, then click Update This Field.
Delete a custom form
To delete a custom form from a booking, click the delete button.
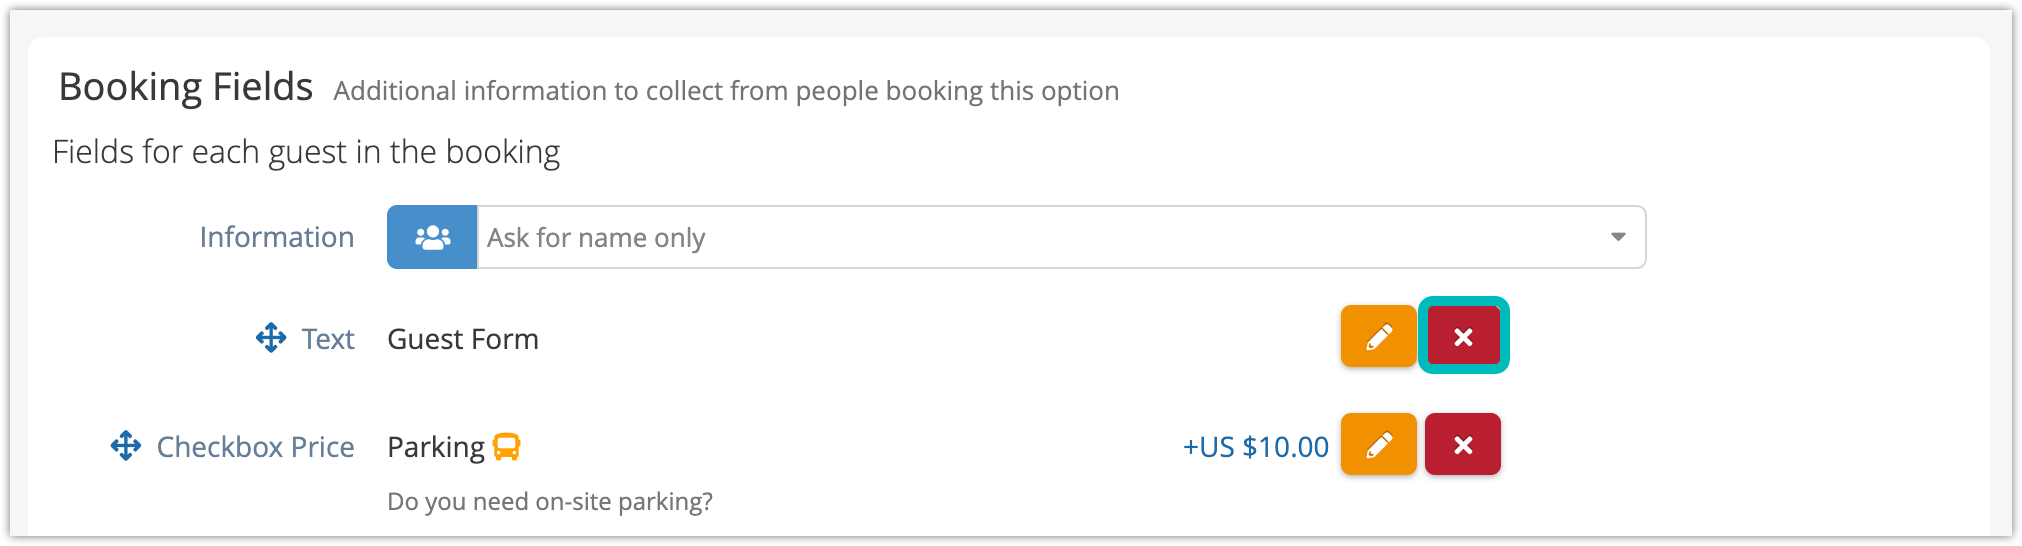
It will be deleted immediately, so you don’t need to confirm.
Copy or bundle custom forms
There are two ways to use forms on other options.
- You can copy forms directly from one option or item to as many others as you’d like. This is great when you’ve just made the forms and you want to add them to existing inventory.
- If you want to save more than one form together to apply them to other options in the future, you can bundle the forms instead. This makes it easy to add several forms to other inventory options in a single click.
Manage forms centrally
You don’t have to find a form on a booking to edit it. The form library lets you edit or delete your forms in one central place.
Find your custom forms and data
To see your forms in action, fill them out, or view their data, you can look in the following places:
- You can run a test booking on your booking website to see custom forms that are available on that inventory. (Remember to cancel the booking so you aren’t charged a booking fee.)
- You edit a booking to fill out custom forms.
- You can view your bookings’ details to see forms that have been filled out
- You can see form flags and details on bookings in the Daily Manifest.
- You can see checkbox and price checkbox flags on bookings on the Dispatch manager.
- You can see primary form details on the Bookings report.
- You can see primary and guest form details on the Manifest report.